Tuesday, 7 August 2018

Lesson 30: chudithar or pyjama

Lesson 30: chudithar or pyjama

In a simple way reduce 2-3 width and 1-4line.. joint the line and extend 1-4 by 10" to 15 " According to avail fabric.
Make paper cutting first.

2-3 is seat/3 +2"
1-4 is  6" or 6.5" with seam allowance of 0.5"

Fold fabric lengthwise first and cross fold to get is bias.
Keep paper cutting and mark extra joint fabric in paper.
Then cut that triangle pc and joint.

Make sure not to stretch the fabric while sewing 3-4 line as fabric is in cross grain.


Happy sewing

Lesson 29: patiyala pants

Lesson 29: patiyala pants
With 3 MTR fabric

Take 2 MTR fabric fold lengthwise once and widthwise once.
Take 1 MTR fabric and fold widthwise twice.
Keep both together and draw the pattern.

With regular salwar construction add 10" extra in width 2-3 line.

This can be cut in 2 ways.
Joint in centre or joint near croutch area.


Joint the pieces. And sew same as regular salwar.
While pleating pleat at the sides facing each other or opposite way.
Not near croutch.


Happy sewing

Lesson 28: salwar pant

Lesson 28: salwar pant

Stitching order:

1) fold and sew 2.5" leground. Do 4 line of stitches to secure well and thick to drop well.
2) sew 3-4 line of both legs with .5" seam allowance.
3) sew crotch curve 5-3-5
4) sew join 2 PC's of waist band. One leaving 2" at top to fold and sew. Other side sew and topstitch it.
5) sew waist band with 1" width
6)Knotch centers of both waist band and pant cloth
Match and pin it
7) pleat and sew both together. Pleats should be facing crotch curve and 2" away from crotch.
8) top stitch


Happy sewing

Friday, 15 June 2018

Lesson 27: kitchen apron

Lesson 27: kitchen apron


Stitching order

1) finish 6-7 with facing cloth.
2) finish sideseam (4-5) &  (2-3)
3) complete armhole curve with bias facing cloth of 2.5" width. Ends near 4,6,7,2 should be open to pass through the rope.
4) fold and sew hemline.
5) make pockets as desired.
6) make rope 1" width. And 90" length.
7) insert from 4-6-7-2 to tie at waist line from 4-2


Happy sewing


Wednesday, 23 May 2018

Lesson 25: Aline frock

Lesson 25: Aline frock

Measurements
Length 20
Chest 21


Construction
0-1 = 20"
0-2 = 21÷6+0.5= 4"
2-3 =21÷4+1=6.25"
1-4=12"
0-7 = 1.5"
0-8 = 3"
7-5 = 2.5"

Stitching order:
1) complete back opening as required (zip or hook or button)
2) finish neck line and armhole curve with cross piece or piping.
3) join side seam
4) finish hemline

Variations in Aline frock :
1) pleats at front neck line
2) raglon sleeve with elastic gathers
3) pleats at center front
4) pleats at shoulders
5) frills in hemline
6) strap shoulders
7) elastic shoulders


Happy sewing

Thursday, 17 May 2018

Lesson 24: Types of jabla

Lesson 24: Types of jabla

1) overlapping jabla:


By extending any one side of front  0-0'and 1-1' by 2" to 3"
Can design overlap pattern.

Finish neck and opening by piping or facing cloth and fix rope or buttons as opening.


2) shoulder rope jabla

Keeping same draft
Draw the neck and armhole curve.
Usually done with contrast piping which ll continue as rope.


3) pot shape jabla

Make 1-4 same as 2-3
Shape the side seam like a pot.
Join the shoulders and attach ropes at the sides.


4) shoulder opening jabla

With same draft extend 2" up  the shoulder 7-5 in back.
And fix buttons.


5) reversible jabla

2 contrast materials is stitched together which can be used on both sides.

Can be done with shoulder open pattern. Or can join shoulders too.

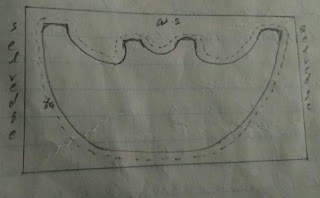
At the back draft curve the line 3-7 and 4' -x

In fabric should cut keeping all paper draft together as single pc and cut leaving 0.25 " seam allowance all around.

Cut the same in 2 different fabrics
Sew all around with 0.25" leaving a small gap at hemline 1- 4' to turn it inside out.
Top stitch fully and secure that open part while doing top stitch.


Happy sewing


Lesson 23: Baby jabla

Lesson 23: Baby jabla


Stitching order:
1) join shoulders of front and back RS facing RS
2) fold and sew back opening
3) finish armhole curve and neckline with cross piece.
Take 1" strips. Fold it into half. Sew 0.25 keeping RS facing RS. Then fold bal 0.25" fold to wrong side and sew on keeping right side of fabric. Or do hand hemming.
4) join side seams.
5) sew hemline
6) Make ropes folding and sewing it. Or can use readily available ropes or satin ribbons
7) attach ropes at back opening leaving 3" intervals at 3places.


Happy sewing


Thursday, 3 May 2018

Lesson 22: panel skirt

Lesson 22: panel skirt

This can be done with scrap materials easily.

For 4yrs
Waist 20"
Plus ease 2"  for rope waist
or 10" for elastic waist
Cut pannels with
Length 15"
Width 3" at top 6" to 9" at bottom
Make sure all pcs r same.
Can cut in same single fabric or multicolour fabrics. Or 2 contrast fabrics.

Join the PC's matching straight line together and crosslines together.

Attach waistband and finish hemline


https://bloomingpoppies.net/tutorials-2/panel-party-skirt-tutorial/


Happy sewing

Lesson 21: gadget skirt

Lesson 21: gadget skirt

Gadget skirt

This can be done on aline skirt or in just rectangular cloth by attaching triangle pcs.

Cut main fabric of rectangular pc with 1.5 times waist and length as required.
Eg: 4yrs
30" width and 15" length as said earlier.
Cut that into 6 PC's with 5" width leaving height of 4 to 5" from waist line.
As length s 15" cut 10" from bottom line leaving 5".
In contrast cloth or same cloth cut triangles with 10" height and width 5 to 10"


Stitching:
1)Join triangles to main fabric.
2) level straight and cut bottom line if difference in fabric after stitching
3) same asusual attach waist band and elastic
4) sew sides of skirt
5) fold hem hemline or picot


Easier to do this model in panel skirt. That's inskirt pattern.
In each joint can attach triangles.


Happy sewing
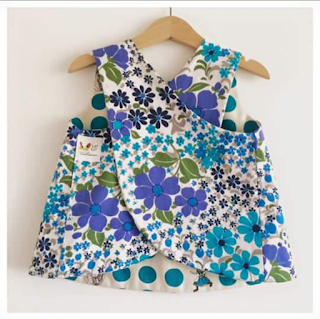
Lesson 20: frilled or raffled skirt

Lesson 20: frilled or raffled skirt

Cut main pc
Waist plus .5times fabric
Length of skirt required.

Eg for 4 yrs:

Width waist20"+10"=30" +1"SA for side joint.
Length 15"

Frills of 3 tier
Width take 2 times the cloth of main fabric.
That's 60"
Length 15/3 =5" plus 1"=6"

Waist band make it elastic.

Stitching:
1) join Main fabric sides joint.
2) mark 3 lines of 5" intervals on full main fabric.
3) Pico one end of all tires after joining side joints.
4) keeping rightside of frills with right side of main fabric make small gathers and sew with .25" Seam allowance.
5) top stitch frills
6) sew waistband and insert elastic


Frills both sides can also be picot and on rightside of main fabric can make frills with .5" seam allowance

http://thegirlinspired.com/tiered-ruffle-skirt-tutorial/


Happy sewing

Lesson 19: wrap around or overlapping skirt

Lesson 19: wrap around or overlapping skirt

Overlap skirt

With same aline skirt or circular skirt overlap can be done.
Just cut extra 1 more front fabric.

In semicircular skirt fold fabric thrice instead of twice. So will get overlap fabric.

Waistband can be done with hooks or rope.

Bottom line can be curved or let straight


Happy sewing

Lesson 18: Gypsy or tired skirt

Lesson 18: Gypsy or tired skirt

Usually I prefer
1.5 times fabric for each tire.

Eg: waist is 20

First tire will be 30" (can do elastic with that ease)
Second tire 45"
Third tire 68"
Fourth 102"

According to number of tires we want to do. Split length and width calculation.

https://blithestitches.wordpress.com/tutorials-tips-and-tricks/tutorial-how-to-make-a-tiered-or-gypsy-dress/


Happy sewing